


Let's get started with Equo SDK
Juan Francisco Ferreira on July 5th 2021
Overview
Equo SDK provides mechanisms to create modern Desktop applications in a fast way. This technology allows the developer to create a new Desktop app, using the two sides of the same development coin: Frontend And Backend.
You may use two different set of technologies: for the frontend you can use HTML5 related technologies like Javascript, HTML, and CSS; and for the backend you may use Java. Then you can communicate each part easily and quickly. The result is a modern desktop application ready to use and distribute.
In this article, we will learn how to create and develop an Equo app, by importing the SDK and using the main features that it provides.
How to Use it?
The best way to know if this technology is useful to the common developer is by trying it on our own. So, let's try them out!
There are two ways to install the Equo SDK to use it in our projects.
If you are working on an already started Java project, you can integrate it with a new Maven dependency, and... that's it, you can start to use it.
To do that you have to add the following dependencies to the pom.xml:
  <dependencies>
+        <dependency>
+            <groupId>com.equo</groupId>
+            <artifactId>com.equo.starter.bom</artifactId>
+            <version>${equo.version}</version>
+        </dependency>
…
  <repositories>
+        <repository>
+            <id>equo-release</id>
+            <name>Equo Public Release Repository</name>
+            <url>https://dl.equo.dev/sdk/mvn/release</url>
+        </repository>
Otherwise, if you are starting a new project from scratch, Equo provides an easy mechanism to get you started: a CLI (Command-Line interface).
To install the Equo CLI, you can open an OS console and execute the following command:
$
curl -L dl.equoplatform.com/cli/rls/linux64/equo.tar.gz | tar -xz && sudo install equo /usr/local/bin
Note: In this case, we use bash console because I am using a Linux-based OS, but the Equo CLI documentation provides several options depending on the OS that you prefer.
Once you have installed the CLI you can start creating your first Equo app from scratch, using the following command:
$
equo create my-first-app
After that, you can run it and take a look at the Equo default app that was automatically generated; using the following command:
$
equo run ./my-first-app
Let's Start Developing your First Equo app
We now have an Equo App created from scratch, but… how do we start adding our own code? First, to help with the development of the app, we may use an IDE with support for Maven projects; in my case I use the Eclipse IDE.
To download the Eclipse IDE for free, go to the Eclipse Foundation official website .
Once you have an IDE installed, you can import your app as a Maven project and you will be ready to code your app. As I already mentioned, Equo allows you to use different kinds of technologies to develop your app. For example, if you take a look at the Project Explorer view and search for MyFirstAppApplication.java on the src/main/java/myfirstapp folder you can see a Java Class implementing and using the Java API defined by Equo SDK. This class is used as the entry point when running an Equo app. You can apply a set of features that the SDK provides to make the development of modern desktop applications easier. You can read more about it on the SDK Java API documentation.
Besides, you can find a file named index.html inside the src/main/resources folder. This file represents the Web UI part of your Equo application. All the resources added inside of the resources folder will be available in your app. So, if you want to separate css, html and javascript code in different files, you can do it by adding them inside the resources folder and referencing them correctly.
Creating a Web UI with VueJS
If you are a frontend developer, you might agree that these days, powerful SDKs and libraries such as AngularJS, ReactJS and VueJS are the common way to develop your modern web application easily. So, we’ll try to develop a simple app using Vue.js and the Equo SDK. Let's go ahead! First, we need to create an Vue Project from scratch, inside the src/main folder of your Equo project, using the following command of the Vue CLI on a terminal:
$
vue create my-vue-app
You can download vue-cli on the Vue CLI official website .
Once created, we can start to improve our app adding some features that the SDK provides.
We can start by adding Javascript and Java intercommunication. Equo also provides a set of Node.js packages publicly available that you can easily use following the related documentation.
In this case, we will add the Equo Communication module, using the following command on the Vue root project:
$
yarn add @equo/comm
or
$
npm install @equo/comm
Now, we can import and use it on a Vue component, for example in the HelloWorld.vue component located in the my-vue-app/src/components folder, as follows:
<template>
  <div class="hello">
    <h1>{{ msg }}</h1>
    <h3>Javascript-Java interaction button</h3>
    <button class="spacing" @click="clickEvent()">Click me</button>
    <div class="spacing">{{ message }}</div>
  </div>
</template>

<script>
  import { EquoCommService } from "@equo/comm";
  let comm = EquoCommService.get();

  export default {
    name: "HelloWorld",
    props: {
      msg: String,
    },
    data() {
      return {
        message: "",
      };
    },
    mounted() {
      comm.on("MyJavaEvent", (res) => {
        console.log(res);
        this.message = res;
      });
    },
    methods: {
      clickEvent() {
        comm.send("myeventhandler", "Hi, I am a message from JS (using NPM)");
      },
    },
  };
</script>

<style scoped>
  div.hello {
    text-align: center;
  }
  h3 {
    margin: 40px 0 0;
  }

  button {
    background-color: rgb(59, 182, 110);
    border: none;
    border-radius: 10px;
    padding: 15px;
  }

  button:hover {
    background-color: rgb(144, 255, 190);
  }

  button:active {
    background-color: rgb(24, 124, 66);
  }

  .spacing {
    margin: 20px;
  }
</style>
Let’s take a look at the above code:
import { EquoCommService } from "@equo/comm";
let comm = EquoCommService.get();
We have to import the EquoComm lib to the Vue component and create an instance that allows us to communicate with the Java side.
comm.on("MyJavaEvent", (res) => {
  console.log(res);
  this.message = res;
});
The .on() method registers a handler with a specific name and a function that will be executed when the handler is called. Additionally we set a variable from the Component template to show the response on the screen.
clickEvent() {
  comm.send("MyEventHandler", "Hi, I am a message from JS (using NPM)")
}
The .send() method calls a specific handler with a message. In this case the handler that will receive the message needs to be registered in Java using the corresponding SDK APIs.
Handling Events on the Java Side
After we've improved our Web UI side, we have to add some changes to the Java side to correctly handle the Equo Java-JS communication, as follows:
Add a new class in the myfirstapp package:
package myfirstapp;

import java.util.Calendar;

import org.osgi.service.component.annotations.Component;
import org.osgi.service.component.annotations.Reference;

import com.equo.comm.api.IEquoEventHandler;
import com.equo.comm.api.actions.IActionHandler;
import com.equo.comm.api.annotations.EventName;

@Component
public class MyEventHandler implements IActionHandler {

    @Reference
    private IEquoEventHandler equoEventHandler;

    @EventName("MyEventHandler")
    public String myFirstEvent(String payload) {
        System.out.println("First event: " + payload);
        String date = Calendar.getInstance().getTime().toString();
        equoEventHandler.send("MyJavaEvent", date);
        return payload;
    }
}
About this we can point out:
public class `MyEventHandler` implements `IActionHandler` {
The handler defined on the Java side has to implement IActionHandler, defining a generic type. This represents the message type that this handler will receive.
@Override
public Object call(String payload) {
This method is necessary to develop the behavior that is executed when the handler is called.
@Reference
private IEquoEventHandler equoEventHandler;
  ...
    equoEventHandler.send("MyJavaEvent",date);
IEquoEventHandler is an interface used to call other handlers. We use the method .send(), defining the handler name called and the message that we want to send.
Adding Native Menus
It's usual that applications have a native menu at the top of the app window. Equo provides two ways to add them, using Javascript or Java. In this case, we will add it in the Web UI part, showing again the intercommunication we saw in the previous section.
To use it, you have to import the node package corresponding to the Menu API as follows:
$
yarn add @equo/equo-application-menu
After that you can create and instance of a menu:
<template>
  <div id="app">
    <img alt="Vue logo" src="./assets/logo.png" />
    <HelloWorld msg="Welcome to Your Vue.js App" />
  </div>
</template>

<script>
  import HelloWorld from "./components/HelloWorld.vue";
  import { Menu } from "@equo/equo-application-menu";
  import { EquoCommService } from "@equo/comm";

  let comm = EquoCommService.get();

  export default {
    name: "App",
    components: {
      HelloWorld,
    },
    beforeMount() {
      Menu.create()
        .withMainMenu("File")
        .addMenuItem("Exit")
        .onClick(() => comm.send("exitevent"))
        .setApplicationMenu();
    },
  };
</script>

<style scoped>
  #app {
    text-align: center;
  }
</style>
In this case we created the menu in the App.vue main component, located inside the src folder.
Let's take a look at the above code:
Menu.create()
  .withMainMenu("File")
  .addMenuItem("Exit")
  .onClick(() => comm.send('exitevent'))
  .setApplicationMenu();
},
The JS api allows you to define the menu using a builder and a set of methods; you can define it by adding methods one by one and finally instance it using setApplicationMenu().
You can see more about how to build a menu in the related documentation.
The menu item we has added has as a click event, which calls an exit event that we will define on the Java side. The following method of the MyEventHandler class handles the exit event:
@EventName("exitevent")
public void exitEvent(String payload) {
  System.out.println("Closing app...");
  System.exit(0);
}
This method closes the application when it is called.
Run the Changes
To test our modifications and to make Equo app development easier in general, we will use the hot reload feature provided by the SDK. The first step that we have to do is to run the Web UI project locally using the npm serve script defined in the package.json. The application will run locally in a specific port (in my case, I use 8080 port). The port is needed to define the value of an environment variable used by the hot reload feature. Then, we have to set the following env var in the run configuration project:
-Ddev.app.url=localhost:8080
If you need extra details about hot reloading, you can check the following documentation .
When you run the app, it should look like this:
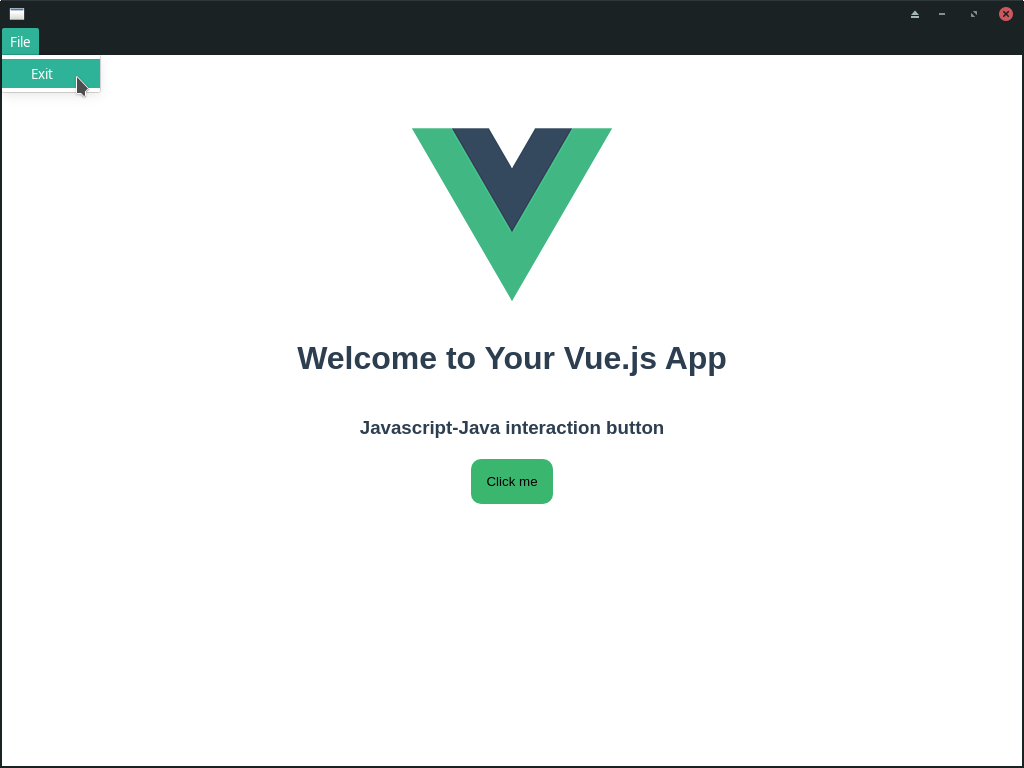
If you click the bottom Click me a new text will appear:
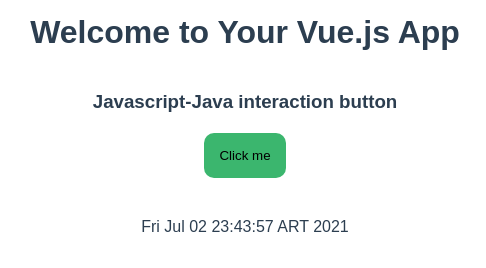
A click on the button Click me triggers an event in the SDK. This JS event is catched by MyEventHandler class on the Java side, where the current date is obtained using the java.utils lib, and sent back to the JS side using EquoEventHandler.send().
This is a simple example of the powerful communication between Javascript and Java that the Equo SDK provides. You can extend your Equo app by adding extra features, such as native menus, re-rendered web dialogs and more. You can learn about them in the official documentation.
We made this first Equo app available in a Github repo, where you can check the source code presented in this article.
If you have any trouble with the development, you can get support in the Discord community server.
The Equo SDK provides a wide set of features, it's not limited to the Java-Js intercommunication and native menus shown in this article. I invite you again to check the Equo SDK official documentation.


